clear your DNS cache if you use MacOSDNS is a backbone of the internet world. DNS Flush (Clear DNS Cache) is a very common activity done by system engineers to resolve internet browsing issue. Here we are trying to explain various methods to clear dns cache for Windows and Mac Operating Systems.

What is DNS Cache and Why You Need To Clear It.
The DNS cache is a small database maintained by a computer. The database contains records of all recently accessed hostnames and IP addresses.
If the location of the web server changes before the entry in your DNS cache updates, you can no longer access the site.
If you encounter a large number of HTML 404 error codes, you may need to clear your DNS cache.
After you clear your DNS cache, your computer will query name servers for the new DNS information.
How to clear your DNS cache
The following methods allow you to remove old and inaccurate DNS information that may result in HTML 404 errors.
Clear DNS Cache in Windows 10
![]()
To reset the DNS resolver cache, perform the following steps:
1. Hold down the Windows key and press “R” to bring up the Run dialog box.
2. Type ipconfig /flushdns then press “Enter“. (be sure there is a space before the slash)
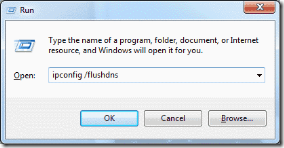
That’s all there is to it. A command box will flash on the screen for a split second and the DNS Resolver cache is cleared.
Windows 8
To clear your DNS cache if you use Windows 8, perform the following steps:
1. On your keyboard, press Win+X to open the WinX Menu.
2. Right-click Command Prompt and select Run as Administrator.
3. Run the following command:
Ipconfig /flushdns
If the command succeeds, the system returns the following message:
“Windows IP configuration successfully flushed the DNS Resolver Cache.”
Windows 7
To clear your DNS cache if you use Windows 7, perform the following steps:
1. Click Start.
2. Enter cmd in the Start menu search text box.
3. Right-click Command Prompt and select Run as Administrator.
4. Run the following command:
Ipconfig /flushdns
5. If the command succeeds, the system returns the following message:
“Windows IP configuration successfully flushed the DNS Resolver Cache.”
Windows XP, 2000, or Vista
To clear your DNS cache if you use Windows XP, 2000, or Vista, perform the following steps:
1. Click Start.
2. On the Start menu, click Run….
• If you do not see the Run command in Vista, enter run in the Search bar.
3. Run the following command in the Run text box:
Ipconfig /flushdns
4. If the command succeeds, the system returns the following message:
Successfully flushed the DNS Resolver Cache.

MacOS 10.10.4 and above
To clear your DNS cache if you use MacOS X version 10.10.4 or above, perform the following steps:
1. Click Applications.
2. Click Utilities.
3. Click Terminal.
4. Run the following command:
sudo killall -HUP mDNSResponder
5. If the command succeeds, the system does not return any output.
6. Warning:
7. To run this command, you must know the computer’s administrator account password.
MacOS 10.5 and 10.6
To clear your DNS cache if you use MacOS X version 10.5 or 10.6, perform the following steps:
1. Click Applications.
2. Click Utilities.
3. Double-click Terminal.
4. Run the following command:
sudo dscacheutil –flushcache
5. If the command succeeds, the system does not return any output.
6. Warning:
7. To run this command, you must know the computer’s administrator account password.
MacOS 10.7, 10.8, and 10.9
To clear your DNS cache if you use MacOS X version 10.7, 10.8, or 10.9, perform the following steps:
1. Click Applications.
2. Click Utilities.
3. Double-click Terminal.
4. Run the following command:
sudo killall -HUP mDNSResponder
5. If the command succeeds, the system does not return any output.
6. Warning:
7. To run this command, you must know the computer’s administrator account password.
MacOS 10.10.1, 10.10.2, and 10.10.3
To clear your DNS cache if you use MacOS X version 10.10 through 10.10.3, perform the following steps:
1. Click Applications.
2. Click Utilities.
3. Click Terminal.
4. Run the following command:
sudo discoveryutil mdnsflushcache
5. If the command succeeds, the system does not return any output.
6. Warning:
7. To run this command, you must know the computer’s administrator account password.
Do you have any question? write in comment box.